Friday, 17 February 2017

MYSQL Enterprise Backup (3.12) RPM installation and Usage

Why MEB(Mysql Enterprise Backup) ??

  •  HOT backup InnoDB tables, Warm MyISAM, MEMORY and other storage engines.
  •  On-the-fly compression (upto 99%)
  •   Full, Incremental and Partial backups.
  •   Quick, lightweight and worry-free backup process.
  •    In-database history tracking.
  •    Easy to copy and manage backup files.
  •    Easy and Fast restore (10X ~)


Installation of MEB using RPM


Step 1: Check if any previous MEB version installed or not

Step 2: If it is not MEB3.12 then remove it and reinstall it
 To remove : 

To Install :

Default location of MEB installation:

Create backup user in mysql DB for backup

CREATE USER 'backupuser'@'localhost' identified by ‘**********’;
GRANT RELOAD ON *.* TO 'backupuser'@'localhost';
GRANT CREATE, INSERT, DROP, UPDATE ON mysql.backup_progress TO 'backupuser'@'localhost';
GRANT CREATE, INSERT, SELECT, DROP, UPDATE ON mysql.backup_history TO 'backupuser'@'localhost';
GRANT REPLICATION CLIENT ON *.* TO 'backupuser'@'localhost';
GRANT SUPER ON *.* TO 'backupuser'@'localhost';


Backup Using MEB

Step 1: Configure script to modify backup directory in example it would be taken /tmp. Script Link Here
--------------------------------------------------------------------------------------------------------
WORKINGDIR=/tmp  (this dir would be location where all backup copy will be placed)
user=root  (user to take backup)
pass=”google@123”  (password for backup user)
dREMOVETIME= 0 (no. of days before that all databases backup would be cleaned up)


Note: When backup happens script will create directory for full and differential at WORKINGDIR=/tmp


Step 2: Make Full backup using script
FULLBACKUPDIR directory would be created in WORKINGDIR(if not) you setup in step1
Under this directory subdirectory would be created with datetime format 

Step 3: Make Incremental Backup using script
INCREMENTALBACKUPDIR directory would be created in WORKINGDIR(if not) you setup in step1
Under this directory subdirectory would be created with datetime format 

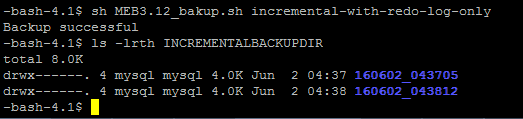
Step 4: Make incremental-with-redo-log-only using script
INCREMENTALBACKUPDIR directory would be created in WORKINGDIR(if not) you setup in step1
Under this directory subdirectory would be created with datetime format 
Step 5: Old Backup cleanup from FULLBACKUPDIR & INCREMENTALBACKUPDIR
 It will clean all backups from directories with no. of days setup in step 1
dREMOVETIME= 0 (for demo it was setup 0 to clean everything and can be changed in step 1) 

RESTORE USING MEB

Step 1: Move backup to target server or ignore if same server 

Step 2: Stop MYSQL database 
Step 3: Restore FULL backup
mysqlbackup --backup-dir=/tmp/FULLBACKUPDIR/160602_041335/ copy-back-and-apply-log --force --uncompress

Step 4: Restore INCREMENTAL above FULL backup
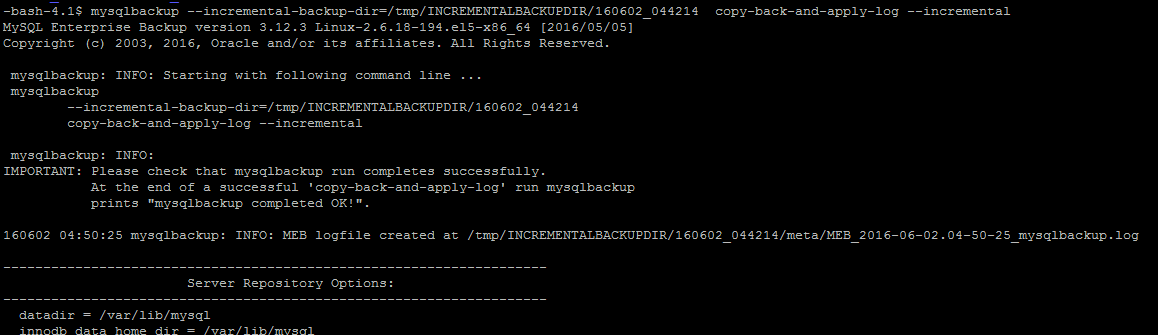
mysqlbackup --incremental-backup-dir=/tmp/INCREMENTALBACKUPDIR/160602_044214 copy-back-and-apply-log --incremental

Step 5: Restore INCREMENTAL above INCREMENTAL
mysqlbackup --incremental-backup-dir=/tmp/INCREMENTALBACKUPDIR/160602_044330 copy-back-and-apply-log --incremental

BACKUP LOGS
All backup logs will be created by default at location /tmp/log


MYSQL 5.6 Master-Master replication setup


This Blog is in continuation of replication setup which we have done in previous blog Master-Slave replication. In previous blog we have configured master-slave replication from NODE1 to NODE2 and in this blog we are going to configure master-slave replication from NODE2 to NODE1, so that each node will work as Master as well as Slave.

Again, this tutorial will use the following Nodes:

NODE1(192.168.56.110) : Master Database(In this case it is Slave)
NODE2(192.168.56.121) : Slave Database (In this case it is Master)


1: Configure the Instance Database (NODE 2)


Edit your configuration file “/etc/my.cnf” to add/edit following parameter on your slave server (NODE 2) to Enable Binary log:

log-bin=/var/lib/mysql_logs/bin-log/Node2-bin-log

Restart mysql server “/etc/init.d/mysql restart 

Create user for replication and give it necessary grants 
Now login to mysql and goto database and apply read lock on all tables. So that data would remain consistent with binlog position in backup. Take the backup > note down the mater binary location> unlock tables.

Information Gathered (this position will be required while configuring slave) 
Binary log file : Node2-bin-log.000003
Position           : 120

Transfer the backup to master machine(NODE1)

2: Configure the Instance Database (NODE 1)

Edit your configuration file “/etc/my.cnf” to add/edit following parameter on your master server (NODE 1) to Enable Relay log:

relay-log=/var/log/mysql/relay-bin

Restart mysql server “/etc/init.d/mysql restart

Import the database that you have exported from slave database(NODE 2) 
Connect you MYSQL prompt again and run below command .It has information which we captured while setting up master previously.

CHANGE MASTER TO MASTER_HOST='192.168.56.121',MASTER_USER='repl', MASTER_PASSWORD='google@123', MASTER_LOG_FILE='Node2-bin-log.000003', MASTER_LOG_POS= 120;


Now, Node2 is configured as Master and Node 1 as Slave. In previous blog you have already configured Node1 as master and Node2 as slave.


Hence your master-master replication has been setup completely.Transaction will in sync on both the instances.Thanks!!

MYSQL 5.6 Master-Slave replication setup

About Replication:

It is also know as coordinate replication.MySQL replication is the method that allows you to create copy of your database automation from master to slave. These replicated instances could be used for backup, DR, HA or simply scale-out.

Here below is quick history for MYSQL replication:

MySQL 3.23 - Generally Available, January 2001
o MySQL Replication came to be (3.23.15 – May 2000).
o Replication filters
MySQL 4.0 - Generally Available, March 2003
o Two Replication Threads instead of just one.
o Slave Relay logs.
MySQL 4.1 - Generally Available, October 2004
o Replication over SSL.
o Disk synchronization options for binary log.
MySQL 5.0 - Generally Available, October 2005
o Replication of Stored Routines and Triggers.
o Slave retries transactions on transient errors.
MySQL 5.1 - Generally Available, November 2008
o Row-based Replication (RBR).
MySQL 5.5 - Generally Available, December 2010
o Semi-sync replication.
o Replication Heartbeats.
o RBR type conversion.
MySQL 5.6 - Generally Available, February 2013
o Crash-safe Slaves.
o Global Transaction Ids.
o Replication Event Checksums.
o Binary Log Group Commit.
o Multi-threaded Slaves.
o RBR enhanced.
o MySQL Utilities 1.3, GA on August 2013
MySQL 5.7.2 DMR, September 2013
o Multi-Threaded Inter-Transactional Replication
o Lossless Semi-Synchronous Replication
o MySQL Utilities 1.4

Here we will take very simple example of mysql replication—one master will send information to a single slave. We have created 2 MYSQL nodes in previous Blogs NODE1 & NODE2

This tutorial will use the following Nodes:

NODE1(192.168.56.110) : Master Database
NODE2(192.168.56.121) : Slave Database

 1: Configure the Master Database (NODE 1)


Edit your configuration file “/etc/my.cnf” to add/edit following parameter on your master server (NODE 1)

a. Look for bind-address and either comment it or put IP address of NODE1

Example:
# bind-address = 127.0.0.1
Or 
bind-address = 192.168.56.110 

b. Next change is server-id you may need to uncomment this parameter and unique number to be provide among nodes

Example:
server-id = 1 

c. Move on to the log_bin line. This is where the real details of the replication are kept. The slave is going to copy all of the changes that are registered in the log. For this step we simply need to uncomment the line that refers to log_bin and provide with location. If location not provided by default it will create in datadir directory.

log_bin = /var/log/mysql/mysql-bin
Restart mysql server “/etc/init.d/mysql restart” and check the position of binarylog

Create user for replication and give it necessary grants
Now login to mysql and goto database and apply read lock on all tables. So that data would remain consistent with binlog position in backup. Take the backup > note down the mater binary location> unlock tables.
Information Gathered (this position will be required while configuring slave)

Binary log file  : mysql-bin.000003
Position           : 120

Transfer the backup to slave machine(NODE2) 


2. Configure the slave server(Node2)

Connect to slave server and create database with same name as master which is required to replicate


Import the database that you have exported from master database(NODE 1) 

Edit your configuration file “/etc/my.cnf” to add/edit following parameter on your slave server (NODE 2)
  
relay-log=/var/lib/mysql_logs/relay-log/Node2-relay-bin
server-id=2

Restart your mysql instance (NODE2)

Connect you MYSQL prompt again and run below command .
It has information which we captured while setting up master previously.

CHANGE MASTER TO MASTER_HOST='192.168.56.110',MASTER_USER='repl', MASTER_PASSWORD='google@123', MASTER_LOG_FILE='mysql-bin.000003', MASTER_LOG_POS= 120;

Now start slave with command “start slave” and then check slave status with command “show slave status \G


Great !! ....You have just built master-slave replication. You can test it out by creating objects in master node1 under database “color” and see data replication on slave node2.

Friday, 10 February 2017

Install MYSQL 5.6 using TARBALL on Linux server


Login to the server (Node1) – prepared in  Previous Blog


Verify any preinstalled MYSQL RPM on server. If yes remove it first using "rpm -ev <rpm name>"


Copy software to specific location on Node 2 and Unzip it


Create Group and user "mysql" on Server Along with its home directory “/home/mysql


Change home directory Ownership to MYSQL:MYSQL


Create Mysql binary path and copy software


UNTAR software using commandtar -xvzf mysql-advanced-5.6.26-linux-glibc2.5-x86_64.tar.gz

                       .
                       .
                       .

Create MySQL data and log directories. Also change ownership to mysql:mysql


Create socket file directory location/path and set ownership


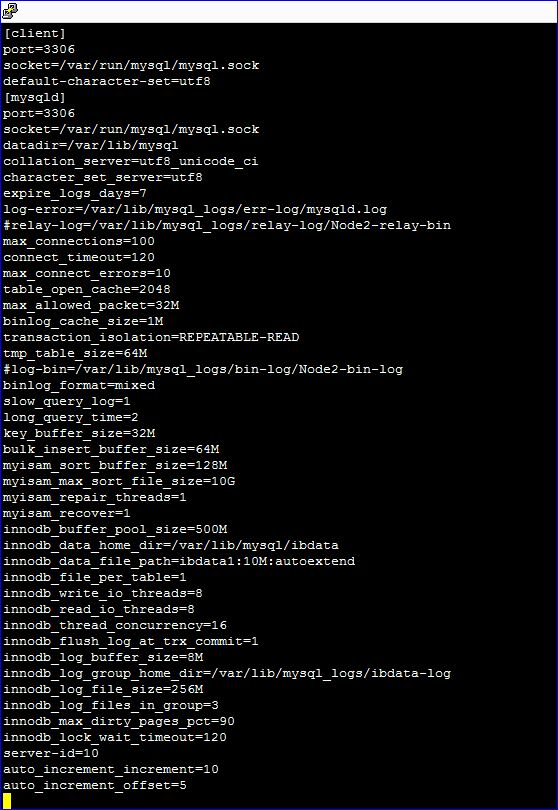
Copy/create new my.cnf file at /etc [/etc/my.cnf]

[client]

port=3306 <------------------------------------ ( Check/Change the port )

socket=/var/run/mysql/mysql.sock <------------------------------ ( Create & Verify directory for socket file )

default-character-set=utf8

[mysqld]

port=3306

socket=/var/run/mysql/mysql.sock <------------------------------- ( Create & Verify directory for socket file )

datadir=/var/lib/mysql

collation_server=utf8_unicode_ci

character_set_server=utf8

expire_logs_days=7

log-error=/var/lib/mysql_logs/err-log/mysqld.log <----------------------------- ( Create & Verify directory for "log-error" )

#relay-log=/var/lib/mysql_logs/relay-log/Node2-relay-bin <--------------------- ( Create & Verify directory for "relay-log" )

max_connections=100

connect_timeout=120

max_connect_errors=10

table_open_cache=2048

max_allowed_packet=32M

binlog_cache_size=1M

transaction_isolation=REPEATABLE-READ

tmp_table_size=64M

#log-bin=/var/lib/mysql_logs/bin-log/Node2-bin-log <----------------------------- ( Create & Verify directory for "log-bin" )

binlog_format=mixed

slow_query_log=1

long_query_time=2

key_buffer_size=32M

bulk_insert_buffer_size=64M

myisam_sort_buffer_size=128M

myisam_max_sort_file_size=10G

myisam_repair_threads=1

myisam_recover=1

innodb_buffer_pool_size=500M

innodb_data_home_dir=/var/lib/mysql/ibdata <--------------- ( Create & Verify directory for "innodb_data_home_dir" )

innodb_data_file_path=ibdata1:10M:autoextend

innodb_file_per_table=1

innodb_write_io_threads=8

innodb_read_io_threads=8

innodb_thread_concurrency=16

innodb_flush_log_at_trx_commit=1

innodb_log_buffer_size=8M

innodb_log_group_home_dir=/var/lib/mysql_logs/ibdata-log <------------------------------- ( Create & Verify directory for "innodb_log_group_home_dir" )

innodb_log_file_size=256M

innodb_log_files_in_group=3

innodb_max_dirty_pages_pct=90

innodb_lock_wait_timeout=120

server-id=220

auto_increment_increment=10

auto_increment_offset=5


Now start MYSQL installation

-Goto mysql binaries location

-Run Command: scripts/mysql_install_db --user=mysql --datadir=/var/lib/mysql


Start the MYSQL with below command

bin/mysqld_safe --defaults-file=/etc/my.cnf --user=mysql &


Create ROOT user in MYSQL with below cmd and Update the PATH variable to contain "MySQL" software path

bin/mysqladmin -u root password 'google@123'


Connect MYSQL with ROOT user


Create service for MYSQL for start and stop

-copy mysql.server to /etc/init.d/


Rename /etc/init.d/mysql.server” to “/etc/init.d/mysql

and edit “/etc/init.d/mysql” with below fields

basedir=/usr/mysql/5.6.26/mysql-advanced-5.6.26-linux-glibc2.5-x86_64/

datadir=/var/lib/mysql


Check status


Set MYSQL binary path environmental variable


 Restart MYSQL instance with below command


Awesome!!! 


MYSQL instance installed sucesssful with TARBALL. Now you have 2 nodes of mysql


Node 1: MYSQL 5.6.24 installed using RPM

Node 2: MYSQL 5.6.24 installed using TARBALL