Saturday, 4 March 2017

Script to monitor MYSQL replication

About Script: 
This shell script can be use as an alternative if there is no monitoring tool in place

Function of script?
It will raise alarm on any of below three conditions comes true
  1. If slave is lagging
  2. If slave is struck
  3. If slave is down 
How to Use?
This script can be scheduled with CRON and will work on polling based mechanism at defined intervals.

+++++++++++++++++++++++++++++++++++++++++++++++++++++++++++++++++++++++
#!/bin/bash
Date=`date`
#DBhost=node1
DBhost=localhost
hostname=`hostname`
DBuser="root"
DBpass="google@123"
MaxDelay="10"

LOG="/tmp/replication_monitor.log"
Slave_OLD_pos=`cat /tmp/.slave_pos`
EMAIL="jasjeet9800@gmail.com"
mysql -u"$DBuser" -p"$DBpass" -h"$DBhost" -e'show slave status \G' > "$LOG"
Slave_NEW_position=`cat "$LOG" |grep "Exec_Master_Log_Pos" |awk '{print $2}'`
slavedelay=`cat "$LOG" |grep "Seconds_Behind_Master"|awk '{print $2}'`

echo "***********************"
echo "Slave old position: "$Slave_OLD_pos
echo "Slave new position: "$Slave_NEW_position
echo "Slave Delay: "$slavedelay"Sec"
echo "***********************"

if [[ $slavedelay -gt $MaxDelay ]]; then
#echo $slavedelay
echo "Slave is behind"
/usr/bin/mail $EMAIL -s "Slave is behind master by $slavedelay on $hostname sec at $Date" <  $LOG
fi

if [[ $slavedelay == "NULL" ]]; then
/usr/bin/mail $EMAIL -s "Slave error occured on $hostname sec at $Date" <  $LOG
echo "Slave error occured"
exit 1
fi

if [[ $Slave_NEW_position -eq $Slave_OLD_pos ]]; then
echo $Slave_NEW_position
/usr/bin/mail $EMAIL -s "Slave is struck on $hostname sec at $Date" <  $LOG
echo "Slave is struck"
fi
echo $Slave_NEW_position > /tmp/.slave_pos
++++++++++++++++++++++++++++++++++++++++++++++++++++++++++++++++++++

Monday, 27 February 2017

MYSQL 5.6 GTID based replication setup


Before going further with GTID based replication let’s have quick look over coordinate replication and understand the need of GTID based replication !!!

How Coordinate Replication Works??
1. Master server enables binary log
2. Client commits query to the master
3. Master executes the query and commits it
4. Master stores the query in the binary log as en event
5. Master returns to the client with commit confirmation
6. Slave server configures replication
mysql> CHANGE MASTER TO MASTER_HOST='192.168.56.110',MASTER_USER='repl',
MASTER_PASSWORD='password',MASTER_LOG_FILE='mysql-bin.000001', MASTER_LOG_POS= 107;

7. Replication starts mysql> START SLAVE;
8. IO thread starts and initiates dump thread on the master
9. Dump thread reads events from binary log
10. Dump thread sends events to IO thread from the slave
11. IO thread writes events into relay log
12. IO thread updates master.info file parameters
13. SQL thread reads relay log events
14. SQL thread executes events on the slave
15. SQL thread updates relay-log.info file

HA and Coordinate Replication
Coordinate based replication is great – it is easy to setup
Coordinate based replication is bad – it is difficult to failover
  • When the master fails, the slaves are ready to replace it
  • However, the process of failure detection and acting upon in case of multiple servers requires significant DBA intervention
  • Difficult to follow changes through a complex replication stream that go to multiple servers
How to Improve It?
If every transaction has its own globally unique identifier (GTID), it becomes a lot easier to track changes

Advantages?
  • It is possible to identify a transaction uniquely across the replication servers.
  • Make the automation of failover process much easier. There is no need to do calculations, inspect the binary log and so on. Just execute the command MASTER_AUTO_POSITION=1.
  • At application level it is easier to do WRITE/READ split. After a write on the MASTER you have a GTID so just check if that GTID has been executed on the SLAVE that you use for reads.
  • Development of new automation tools isn’t a pain now.

Drawbacks?
  • Additional complexity
  • Incompatibility with existing solution – coordinate based replication

What is GTID??


GTID Replication Basics

  • Each server has binary log (master and slave)
  • GTIDs are written into binary log
  • GTIDs executed on a server contained in a new, read-only, global server variable GTID_EXECUTED
  • GTID_EXECUTED holds the range of GTIDs committed on this server as a string

How to Configure GTID Replication??

STEP 1: Edit my.cnf with new additional parameters

gtid_mode

  • It could be ON or OFF (not 1 or 0)
  • It enables the GTID on the server
log_bin (existed)
  • Enables binary logs
  • Mandatory to create a replication
log-slave-updates
  • Slave servers must log its changes
  • Needed for server promotion/demotion
enforce-gtid-consistency
  • Forces the server to be safe by using only transactional tables
  • Non-transactional statements are denied by the server.

STEP 2: New replication configuration command
slave> CHANGE MASTER TO MASTER_HOST=’node1',
MASTER_USER=’root',
MASTER_PASSWORD=’google@123',
MASTER_AUTO_POSITION=1;


Ahh!! Enough theory we had I guess, let’s Have Practical implementation now J :


Below are the high level Steps for GTID based "master-master" replication setup


  1. Enable GTID each nodes
  2. Create replication users on each nodes
  3. Take the backup from master and restore on slave servers ( Skip this step if both servers are new / fresh installation )
  4. Verify the GTID parameters
  5. Configure the replication with GTID in place.


STEP 1: Enable GTID each nodes


On Node1:
Edit you /etc/my.cnf to add GTID parameters followed by restart


On Node2: Edit your /etc/my.cnf to add GTID parameters followed by restart


STEP 2: Create replication users on each nodes
This would be the same user which we have created in coordinate based replication(previous blog). I am just pasting the command. Those who are doing fresh setup need to do on both nodes.

GRANT REPLICATION SLAVE ON *.* TO 'repl'@'%' IDENTIFIED BY 'google@123';

STEP 3: Take the backup from master and restore on slave servers ( Skip this step if both servers are new / fresh installation )

Backup the master instance

$ mysqlbackup -uroot -pgoogle@123 --datadir=/var/lib/mysql --backup_dir=/tmp/ --with-timestamp backup-and-apply-log

Restore the backup on Slave node
$ mysqlbackup --defaults-file=/etc/my.cnf --datadir=/var/lib/mysql/ --backup-dir=/tmp/2017-02-27_14-51-33 copy-back-and-apply-log
STEP 4: Verify the GTID parameters on both nodes
show global variables like '%gtid%';

STEP 5: Configure the replication with GTID in place. Skip stop and reset slave for new replication setup.
I reset it because we have already coordinate replication in place configured in previous blog. 

On Node1:

stop slave;
reset slave;
show slave status\G
CHANGE MASTER TO MASTER_HOST='192.168.56.121',MASTER_USER='repl', MASTER_PASSWORD='google@123',MASTER_AUTO_POSITION = 1;
start slave;


On Node2:
stop slave;
reset slave;
show slave status\G
CHANGE MASTER TO MASTER_HOST='192.168.56.110',MASTER_USER='repl', MASTER_PASSWORD='google@123',MASTER_AUTO_POSITION = 1;
start slave;


Great !!! your MASTER-MASTER GTID based replication has been configured and you can test it out by creating test objects on any of instance and you will notice that transactions are start flowing using GTID.

Notice at the end of SHOW SLAVE STATUS\G results.


Sunday, 19 February 2017

Install MYSQL 5.7 using RPM on Linux server


STEP 1: Download correct binaries MYSQL 5.7 RPM from “edelivery.oracle.com”


STEP 2: Check if any RPM for MYSQL is already installed , If YES remove it first using command in step 3.
STEP 3: Remove MYSQL RPM using below command
a. This command will remove installed rpm by the name provided but failed if any dependency, then you need to remove dependent rpm first

rpm -ev <MYSQL-rpm-name-here>
b. This command will remove RPM irrespective of dependency by ignoring any dependencies for target RPM
rpm -ev --nodeps <MYSQL-rpm-name-here>


STEP 4: Unzip downloaded RPM to any working directory

STEP 5: Start installing RPM in following sequence, using below example
a. mysql-commercial-common-5.7.14-1.1.sles12.x86_64.rpm
b. mysql-commercial-libs-5.7.14-1.1.sles12.x86_64.rpm
c. mysql-commercial-client-5.7.14-1.1.sles12.x86_64.rpm
d. mysql-commercial-server-5.7.14-1.1.sles12.x86_64.rpm
e. mysql-commercial-test-5.7.14-1.1.sles12.x86_64.rpm

Command : rpm –ivh <mysql-rpm-name>
Example:
rpm –ivh mysql-commercial-common-5.7.14-1.1.sles12.x86_64.rpm


STEP 6: Start MYSQL for the first time


STEP 7: Login MYSQL database using secret password generated in logfile “/var/log/mysqld.log


STEP 8: Login to MYSQL 5.7 using one-time secret password

Saturday, 18 February 2017

MYSQL 5.6.x TARBALL based upgrade process

This document can be used in following scenarios :


  • MySQL Major version upgrade TARBALL based 
  • MySQL Minor version upgrade TARBALL based 
  • MySQL Security Patch apply TARBALL based 

In this tutorial, we will upgrade MYSQL instance 5.6.26 installed using TARBALL in blog (Install MYSQL 5.6 using TARBALL) on Linux server to new version MYSQL 5.6.34

Quick High Level steps:
  • Backup database - I used MEB(3.12) but Mysqldump or a cold backup is okay
  • Shutdown the database cleanly. 
  • UNTAR new binaries to specified location
  • Start MYSQL with new home and set environment 
  • Run mysql_upgrade for new release

Detailed Low Level steps:

STEP1: Download correct binary from Oracle and move to target machine, in our case its NODE2 and then UNZIP it.

STEP 2: Take full backup of instance and shutdown instance gracefully


STEP 3: Make directory for new binaries and extract “UNTAR” software at the location
mkdir -p /usr/mysql/5.6.34
tar -xvzf mysql-advanced-5.6.34-linux-glibc2.5-x86_64.tar.gz -C /usr/mysql/5.6.34

   
    . 
    .
    . 


STEP 4: Go to the new binaries directory location & start the MySQL instance.
cd /usr/mysql/5.6.34/mysql-advanced-5.6.34-linux-glibc2.5-x86_64/
bin/mysqld_safe --defaults-file=/etc/my.cnf --user=mysql &


STEP 5: Check if MYSQL process has been started from new home(5.6.34)
ps -ef|grep mysql


STEP 6: Upgrade the MYSQL start/stop script for new home
cd /etc/init.d/
vim mysql


STEP 7: Export new binary path and update new path in .profile for future access
export PATH=$PATH:/usr/mysql/5.6.34/mysql-advanced-5.6.34-linux-glibc2.5-x86_64/bin
which mysql


STEP 8: Run mysql_upgrade using new home
cd /usr/mysql/5.6.34/mysql-advanced-5.6.34-linux-glibc2.5-x86_64/
bin/mysql_upgrade -uroot –pgoogle@123 --port=3306


STEP 9: Restart MYSQL and check upgraded version
/etc/init.d/mysql restart
\s


That's All !! YOUR  INSTANCE UPGRADED SUCESSFULLY !!!

MYSQL Enterprise Backup (3.12) TARBALL Installation and Usage


Installation of MEB using TARBALL


STEP 1: Download the correct binary from Oracle and unzip in temp directory


STEP 2
: Untar the package to specific binary location. I choose same location where MYSQL binaries are, then renamed folder for convenience.

tar -xvzf meb-3.12.3-linux-glibc2.5-x86-64bit.tar.gz -C /usr/mysql/

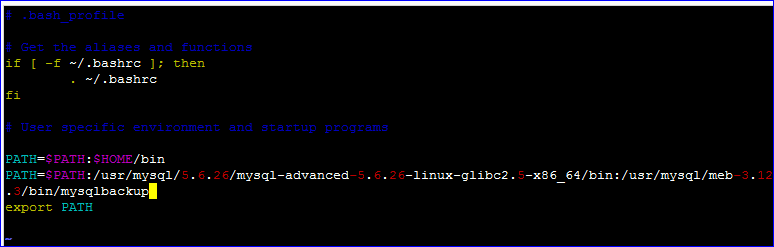
STEP 3: Export MEB binary path and edit .profile for future PATH setups
export PATH=$PATH:/usr/mysql/meb-3.12.3/bin /*MEB binary path*/
which mysqlbackup /*to check if path setup works*/

Vim .bash_profile


USAGE:

For usage please follow my previous blogs for different modes of backup/restore options along with MEB shell script for daily backup setup. Please find below links for the same.

MYSQL 5.6.x RPM based upgrade process


This document can be used in following scenarios :

  • MySQL Major version upgrade RPM based 
  • MySQL Minor version upgrade RPM based 
  • MySQL Security Patch apply RPM based

In this tutorial, we will upgrade MYSQL instance 5.6.24 installed using RPM in blog (Install MYSQL 5.6 using RPM on Linux server) to new version MYSQL 5.6.35

Quick High Level steps:
  • Backup database - I used MEB(3.12) but Mysqldump or a cold backup is okay
  • Shutdown the database cleanly. 
  • Upgrade the binaries (rpm -Uvh) Start the database
  • Run mysql_upgrade for new release.
Detailed Low level steps:

STEP1: Download correct binary from Oracle and move to target machine, in our case its NODE1 and then UNZIP it.


STEP 2: Take full backup of instance and shutdown instance gracefully


STEP 3: Upgrade the binaries of MYSQL(Note: client first then server)

rpm –qa |grep –i “mysql” /*To check current installed RPM*/
rpm –Uvh MySQL-client-advanced-5.6.34-1.el6.x86_64.rpm /*Client Upgrade*/
rpm –Uvh MySQL-server-advanced-5.6.34-1.el6.x86_64.rpm /*Server Upgrade*/


STEP 4: Start MYSQL and run mysql_upgrade 
/etc/init.d/mysql start
mysql_upgrade -uroot -pgoogle@123


STEP 5 : Login MYSQL and check upgraded version
mysql -uroot -pgoogle@123

\s


That’s it !!! You just upgraded MYSQL minor version with RPM based installation.


Friday, 17 February 2017

MEB3.12_bakup.sh


#!/bin/bash
#creates and maintains MySQL Enterprise Backup (MEB) backups
#prints usage
usage()
{
    echo version: "$VERSION"
    echo "
Usage: `basename $0` [command] [MEB options]
Commands:
    full                                make full backup
    incremental                         make incremental backup
    incremental-with-redo-log-only      make incremental backup with redo log only
    remove-old                          remove old backups
    "
}
# creates defaults values
initialize()
{
###############################################
#manual entries by user
    WORKINGDIR=/tmp
    user=root
    pass="google@123"
    dREMOVETIME=0
    VERSION=1.0
#Manual entries section ends
################################################
    MEBOPTIONS=
    CURDATE=`date +%y%m%d_%H%M%S`
#pre-defined defaults, can be overriden
    dMYSQLBACKUP="/usr/local/mysql/bin/mysqlbackup"
    dBACKUPDIR=$WORKINGDIR/FULLBACKUPDIR
    dINCREMENTALDIR=$WORKINGDIR/INCREMENTALBACKUPDIR
    dLOGDIR=$WORKINGDIR/log
    dBACKUPIMAGENAME=backup
    dOUTLOG=backup_output.log
    #clean failed backups
    dCLEANUP=0
    
}
if [[ ! -e /tmp/log ]]; then
            mkdir -p /tmp/log
fi
#parses options
parse_options()
{
    if [ -z "$1" ]
    then
        usage
        exit 1
    fi
    case $1 in
    full)                    COMMAND=do_full;;
    incremental)                      COMMAND=do_incremental;;
    incremental-with-redo-log-only)           COMMAND=do_incremental_with_redo_log_only;;
    remove-old)                      COMMAND=do_remove_old;;
    *)                     usage; exit 1;;
    esac
    shift
    MEBOPTIONS=$@
    
    #setting environment variables
    if [ -z $MYSQLBACKUP ]
    then
        MYSQLBACKUP=`which mysqlbackup`
        if [ -z $MYSQLBACKUP ]
        then
            MYSQLBACKUP=$dMYSQLBACKUP
        fi
    fi
    
    if [ -z $BACKUPDIR ]
    then
        BACKUPDIR=${dBACKUPDIR}
    fi
    
    if [ -z $INCREMENTALDIR ]
    then
        INCREMENTALDIR=${dINCREMENTALDIR}
    fi
    
    if [ -z $LOGDIR ]
    then
        LOGDIR=$dLOGDIR
    fi
    
    if [ -z $OUTLOG ]
    then
        OUTLOG=${dOUTLOG}.${CURDATE}
    fi
    
    if [ -z $REMOVETIME ]
    then
        REMOVETIME=$dREMOVETIME
    fi
    
    if [ -z $CLEANUP ]
    then
        CLEANUP=$dCLEANUP
    fi
    
}
#cleans up failed backups
cleanup()
{
    result=$?
    if [[ 0 -ne $result ]]
    then
        echo "Backup failed"
        if [[ 1 -eq $CLEANUP ]]
        then
        echo "Environment variable CLEANUP set, removing corrupted backup image"
            rm -f $1
        fi
        exit 1;
    else
        echo "Backup successful"
    fi
    if [[ 1 -eq $CLEANUP ]]
    then
        echo "Removing backup directory"
    fi
}
#makes full backup
do_full()
{
    $MYSQLBACKUP $MEBOPTIONS --backup-dir=$BACKUPDIR/${CURDATE} --compress --skip-binlog -u$user -p$pass backup >$LOGDIR/$OUTLOG 2>&1 
    cleanup $BACKUPDIR/$BACKUPIMAGENAME
}
#makes incremental backup
do_incremental()
{
    $MYSQLBACKUP $MEBOPTIONS --incremental --incremental-base=history:last_backup --incremental-backup-dir=$INCREMENTALDIR/${CURDATE} --skip-binlog  -u$user -p$pass  backup >$LOGDIR/$OUTLOG 2>&1
    cleanup $INCREMENTALDIR/$BACKUPIMAGENAME
}
#makes incremntal with redo long only backup
do_incremental_with_redo_log_only()
{
    $MYSQLBACKUP $MEBOPTIONS --incremental-with-redo-log-only --incremental-base=history:last_backup --incremental-backup-dir=$INCREMENTALDIR/${CURDATE} --skip-binlog  -u$user -p$pass backup >$LOGDIR/$OUTLOG 2>&1
    cleanup $INCREMENTALDIR/$BACKUPIMAGENAME
}
do_remove_old()
{
    find $BACKUPDIR/* -maxdepth 0 -type d -ctime +$REMOVETIME -exec rm -rf {} \;
    find $INCREMENTALDIR/* -maxdepth 0 -type d -ctime +$REMOVETIME -exec rm -rf {} \;
}
initialize
parse_options $@
$COMMAND
exit 0